Introduction of 12 step of Surya Namaskar or Sun Salutaion
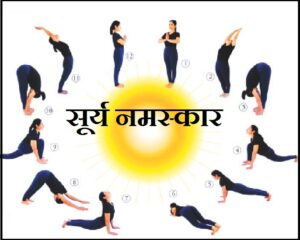
Surya Namaskar, or Sun Salutation, is a sequence of yoga postures designed to greet the sun and invigorate the body. It consists of 12 steps or asanas. Here’s a step-by-step guide on how to perform Surya Namaskar:
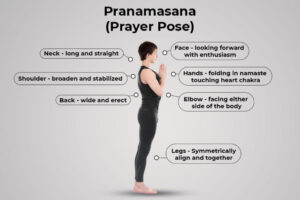
Step 1: 1st step of Surya Namaskar ‘Pranamasana’ (Prayer Pose)
- Stand at the front edge of your yoga mat with your feet together. The Finger of Feet are aprt from each other.
- Spine, Neck and Head are in a line. Chest is lifted, and the stomach is comfortably pulled in, shoulders are rolled back, and the eyes are focused in one place ahead.
- Keep your palms together in a prayer position at your chest. All fingers are spread out, prepare for the expression of reverence in the Namaskar.
- Take a moment to center yourself and focus on your breath.

Common Mistake
The awareness of keeping the spine, neck, and head in a straight line is lacking. While standing, the chest remains compressed, which obstructs the flow of breath towards the heart and lungs.
Step 2: 2nd Step of Surya Namaskar ‘Hastauttanasana’ (Raised Arms Pose)
- Inhale deeply as you raise your arms above your head, arching your back slightly.
- Keep your biceps close to your ears, and look up gently.
- Lengthen your spine and stretch your whole body.
Common Mistake
The biggest mistake is bringing the hands together and taking them backward. This prevents the proper expansion of the chest, and as a result, the heart and lungs don’t receive the necessary strength. Many people tend to focus on bending backward, whereas in all backward-bending poses, the first step is to lengthen the spine upwards. Some individuals keep their necks forward when, in fact, the spine should move backward. Avoid closing your eyes as it can lead to dizziness, and some people bend their wrists, but the palm should stay flat against the ground.
Step 3: 3rd Step of Surya Namaskar Hasta Padasana (Hand to Foot Pose)
- Exhale as you bend forward at the waist, keeping your spine straight.
- Bring your hands down to the floor beside your feet.
- If you can’t reach the floor, you can bend your knees slightly.
Common Mistake
When bending forward, we often bend from the waist instead of bending from the hips, which disrupts the spine alignment. Having a crooked spine doesn’t provide any benefits, but it increases extra pressure on the discs located between the vertebrae. Many people tend to forcefully touch their heads to their knees, which is not natural. It’s better to bend forward while elongating the spine and neck towards the floor, which can help prevent any discomfort in the lower back.
Step 4: 4th Step of Surya NamaskarAshwa Sanchalanasana (Equestrian Pose)
- Inhale and step your right leg back into a lunge position.
- Keep your left knee bent at a 90-degree angle.
- Look up and keep your hands on the mat.
Common Mistake
The most common mistake happens in this position. Most practitioners tend to extend their knees far beyond their toes, which can lead to tension in the thigh muscles and limit your range of motion. Some practitioners also tuck their toes inside, which increases the strain when compared to keeping them outside.
Step 5: 5th Step of Surya NamaskarDandasana (Stick Pose)
- Exhale and step your left leg back to come into a plank position.
- Your body should be in a straight line from head to heels.
- Engage your core muscles.
Common Mistake
Most practitioners tend to lower their waist, whereas the lower back should be lifted at the level of the shoulders. Otherwise, there is excessive strain on the hands, which can lead to discomfort in the wrists. Some practitioners extend their shoulders forward from the wrist joint, which is an incorrect position. The shoulders should be kept in line with the palms.
Step 6: 6th Step of Surya NamaskarAshtanga Namaskara (Salute with Eight Limbs)
- Gently lower your knees, chest, and chin to the floor.
- Keep your hips elevated.
- Eight parts of your body should touch the floor: two hands, two feet, knees, chest, and chin.
Common Mistake
While transitioning from Dandasana to this position, most practitioners tend to lower their elbows downward, which can lead to shoulder issues. The position of the palms should ideally remain beside the chest, while placing them near the shoulders would be considered incorrect.
Step 7: 7th Step of Surya NamaskarBhujangasana (Cobra Pose)
- Inhale as you slide forward and raise your chest and head.
- Keep your hips on the ground and look up.
- This is a gentle backbend.
Common Mistake
In Bhujangasana, many mistakes can often be observed. Placing the elbows and toes outside is an incorrect position as it can create unnecessary pressure on the lower back. Some practitioners keep their arms completely straight in Bhujangasana, which may deprive you of its proper benefits. Keeping the arms straight won’t increase pressure on the heart and lungs in the correct position, and they won’t become stronger. On the contrary, it can lead to discomfort in the lower back. Some practitioners unknowingly lift their shoulders upward, whereas the shoulders should be left in a relaxed position.
Step 8: Parvatasana (Mountain Pose)
- Exhale and lift your hips, forming an inverted V shape with your body.
- Keep your heels pressed towards the floor and your head between your arms.
- Engage your core.
Common Mistake
If you experience lower back pain or reduced flexibility in the spine, you can slightly bend your knees in this position to avoid putting excessive strain on the lower back. It allows for less pressure on the lower back, and the elongation of the spine can provide relief to muscles and spinal discs.
Step 9: Ashwa Sanchalanasana (Equestrian Pose)
- Inhale and step your right foot forward between your hands, returning to the lunge position.
- Look up and keep your hands on the mat.
Common Mistake
In the fourth position, people tend to bring their right foot back, and during the ninth position, they bring the left foot forward again, causing the same foot to stretch twice. This requires waiting for the next round for the other foot. For the fourth position, bring back the same foot that was taken back in the ninth position.
Step 10: Hasta Padasana (Hand to Foot Pose)
- Exhale and bring your left foot forward to meet the right foot.
- Keep your palms on the floor or grab your ankles.
- Your spine should remain straight.
Common Mistake
Most practitioners tend to forcefully touch their heads to their knees, which is not natural. It’s better to bend forward while elongating the spine and neck towards the floor, without applying any force in this position.
Step 11: Hastauttanasana (Raised Arms Pose)
- Inhale as you straighten your torso and raise your arms above your head.
- Arch your back slightly and look up.
- Stretch your entire body.
Common Mistake
When rising up, keep the spine and lower back slightly bent. Bring your hands together and lift them upwards while keeping them shoulder-width apart. The other common mistakes in this position are similar to those in the other postures.
Step 12: Pranamasana (Prayer Pose)
- Exhale as you return to the standing position.
- Keep your palms pressed together in a prayer position at your chest.
- Take a moment to breathe and center yourself.
Common Mistake
Some practitioners bring their hands to the sides, but the other common mistakes in this posture are the same as those mentioned in the first position.
Repeat this sequence several times, alternating the leading leg in the lunge position each time. Surya Namaskar is an excellent way to start your day with a yoga practice that promotes flexibility, strength, and mental clarity. Remember to breathe deeply and mindfully throughout the practice. If you’re new to yoga or have any medical conditions, it’s advisable to consult with a qualified yoga instructor before starting Surya Namaskar or any yoga practice
Tips
Please do all practice very carefully, if any problem occur please contact expert of yoga or stop practice
My priveous post
